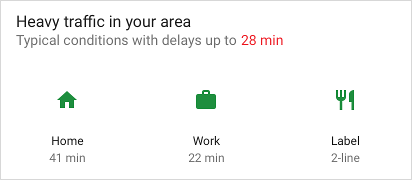
This document provides details on how to use the template builders in Android Jetpack to construct Slices.
Define your Slice template
Slices are constructed by using a
ListBuilder. ListBuilder
allows you to add different types of rows that are displayed in a list. This
section describes each of those row types and how they are constructed.
SliceAction
The most basic element of a Slice template is a
SliceAction. A SliceAction
contains a label along with a
PendingIntent and is one of the
following:
- Icon button
- Default toggle
- Custom toggle (a drawable with an on/off state)
SliceAction is used by the template builders described in the rest of this
section. A SliceAction can have an image mode defined that determines how the
image is presented for the action:
ICON_IMAGE: tiny size and tintableSMALL_IMAGE: small size and non-tintableLARGE_IMAGE: largest size and non-tintable
HeaderBuilder
In most cases, you should set a header for your template using a
HeaderBuilder.
A header can support the following:
- Title
- Subtitle
- Summary subtitle
- Primary action
Some example header configurations are shown below. Note that gray boxes show potential icon and padding locations:


Header rendering on different surfaces
When a Slice is needed, the displaying surface determines how to render the Slice. Note that rendering might differ somewhat between hosting surfaces.
In smaller formats, usually only the header is displayed, if one exists. If you’ve specified a summary for the header, the summary text is shown instead of the subtitle text.
If you have not specified a header in your template, the first row added to your
ListBuilder is usually displayed instead.
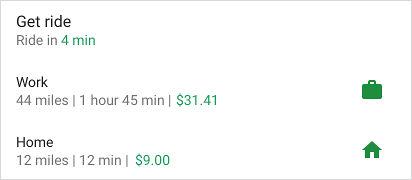

HeaderBuilder example - Simple list Slice with header
Kotlin
fun createSliceWithHeader(sliceUri: Uri) =
    list(context, sliceUri, ListBuilder.INFINITY) {
        setAccentColor(0xff0F9D) // Specify color for tinting icons
        header {
            title = "Get a ride"
            subtitle = "Ride in 4 min"
            summary = "Work in 1 hour 45 min | Home in 12 min"
        }
        row {
            title = "Home"
            subtitle = "12 miles | 12 min | $9.00"
            addEndItem(
                IconCompat.createWithResource(context, R.drawable.ic_home),
                ListBuilder.ICON_IMAGE
            )
        }
    }
Java
public Slice createSliceWithHeader(Uri sliceUri) {
    if (getContext() == null) {
        return null;
    }

    // Construct the parent.
    ListBuilder listBuilder = new ListBuilder(getContext(), sliceUri, ListBuilder.INFINITY)
            .setAccentColor(0xff0F9D58) // Specify color for tinting icons.
            .setHeader( // Create the header and add to slice.
                    new HeaderBuilder()
                            .setTitle("Get a ride")
                            .setSubtitle("Ride in 4 min.")
                            .setSummary("Work in 1 hour 45 min | Home in 12 min.")
            ).addRow(new RowBuilder() // Add a row.
                    .setPrimaryAction(
                            createActivityAction()) // A slice always needs a SliceAction.
                    .setTitle("Home")
                    .setSubtitle("12 miles | 12 min | $9.00")
                    .addEndItem(IconCompat.createWithResource(getContext(), R.drawable.ic_home),
                            SliceHints.ICON_IMAGE)
            ); // Add more rows if needed...
    return listBuilder.build();
}
SliceActions in headers
Slice headers can also display SliceActions:

Kotlin
fun createSliceWithActionInHeader(sliceUri: Uri): Slice {
    // Construct our slice actions.
    val noteAction = SliceAction.create(
        takeNoteIntent,
        IconCompat.createWithResource(context, R.drawable.ic_pencil),
        ICON_IMAGE,
        "Take note"
    )

    val voiceNoteAction = SliceAction.create(
        voiceNoteIntent,
        IconCompat.createWithResource(context, R.drawable.ic_mic),
        ICON_IMAGE,
        "Take voice note"
    )

    val cameraNoteAction = SliceAction.create(
        cameraNoteIntent,
        IconCompat.createWithResource(context, R.drawable.ic_camera),
        ICON_IMAGE,
        "Create photo note"
    )

    // Construct the list.
    return list(context, sliceUri, ListBuilder.INFINITY) {
        setAccentColor(0xfff4b4) // Specify color for tinting icons
        header {
            title = "Create new note"
            subtitle = "Easily done with this note taking app"
        }
        addAction(noteAction)
        addAction(voiceNoteAction)
        addAction(cameraNoteAction)
    }
}
Java
public Slice createSliceWithActionInHeader(Uri sliceUri) {
    if (getContext() == null) {
        return null;
    }
    // Construct our slice actions.
    SliceAction noteAction = SliceAction.create(takeNoteIntent,
            IconCompat.createWithResource(getContext(), R.drawable.ic_pencil),
            ListBuilder.ICON_IMAGE, "Take note");

    SliceAction voiceNoteAction = SliceAction.create(voiceNoteIntent,
            IconCompat.createWithResource(getContext(), R.drawable.ic_mic),
            ListBuilder.ICON_IMAGE,
            "Take voice note");

    SliceAction cameraNoteAction = SliceAction.create(cameraNoteIntent,
            IconCompat.createWithResource(getContext(), R.drawable.ic_camera),
            ListBuilder.ICON_IMAGE,
            "Create photo note");


    // Construct the list.
    ListBuilder listBuilder = new ListBuilder(getContext(), sliceUri, ListBuilder.INFINITY)
            .setAccentColor(0xfff4b400) // Specify color for tinting icons
            .setHeader(new HeaderBuilder() // Construct the header.
                    .setTitle("Create new note")
                    .setSubtitle("Easily done with this note taking app")
            )
            .addRow(new RowBuilder()
                    .setTitle("Enter app")
                    .setPrimaryAction(createActivityAction())
            )
            // Add the actions to the ListBuilder.
            .addAction(noteAction)
            .addAction(voiceNoteAction)
            .addAction(cameraNoteAction);
    return listBuilder.build();
}
RowBuilder
You can construct a row of content by using a
RowBuilder. A row
can support any of the following:
- Title
- Subtitle
- Start item: SliceAction, Icon, or a timestamp
- End items: SliceAction, Icon, or a timestamp
- Primary action
You can combine row content in a number of ways, subject to the following restrictions:
- Start items will not show in the first row of a Slice
- End items cannot be a mix of
SliceActionobjects andIconobjects - A row can contain only one timestamp
Example rows of content are shown in the following images. Note that gray boxes show potential icon and padding locations:


RowBuilder example - Wi-Fi toggle
The example below demonstrates a row with a primary action and a default toggle.

Kotlin
fun createActionWithActionInRow(sliceUri: Uri): Slice {
    // Primary action - open wifi settings.
    val wifiAction = SliceAction.create(
        wifiSettingsPendingIntent,
        IconCompat.createWithResource(context, R.drawable.ic_wifi),
        ICON_IMAGE,
        "Wi-Fi Settings"
    )

    // Toggle action - toggle wifi.
    val toggleAction = SliceAction.createToggle(
        wifiTogglePendingIntent,
        "Toggle Wi-Fi",
        isConnected /* isChecked */
    )

    // Create the parent builder.
    return list(context, wifiUri, ListBuilder.INFINITY) {
        setAccentColor(0xff4285) // Specify color for tinting icons / controls.
        row {
            title = "Wi-Fi"
            primaryAction = wifiAction
            addEndItem(toggleAction)
        }
    }
}
Java
public Slice createActionWithActionInRow(Uri sliceUri) {
    if (getContext() == null) {
        return null;
    }
    // Primary action - open wifi settings.
    SliceAction primaryAction = SliceAction.create(wifiSettingsPendingIntent,
            IconCompat.createWithResource(getContext(), R.drawable.ic_wifi),
            ListBuilder.ICON_IMAGE,
            "Wi-Fi Settings"
    );

    // Toggle action - toggle wifi.
    SliceAction toggleAction = SliceAction.createToggle(wifiTogglePendingIntent,
            "Toggle Wi-Fi", isConnected /* isChecked */);

    // Create the parent builder.
    ListBuilder listBuilder = new ListBuilder(getContext(), wifiUri, ListBuilder.INFINITY)
            // Specify color for tinting icons / controls.
            .setAccentColor(0xff4285f4)
            // Create and add a row.
            .addRow(new RowBuilder()
                    .setTitle("Wi-Fi")
                    .setPrimaryAction(primaryAction)
                    .addEndItem(toggleAction));
    // Build the slice.
    return listBuilder.build();
}
GridBuilder
You can construct a grid of content by using a
GridBuilder. A grid can
support the following image types:
ICON_IMAGE: tiny size and tintableSMALL_IMAGE: small size and non-tintableLARGE_IMAGE: largest size and non-tintable
A grid cell is constructed by using a
CellBuilder. A
cell can support up to two lines of text and one image. A cell cannot be empty.
Grid examples are shown in the following images:


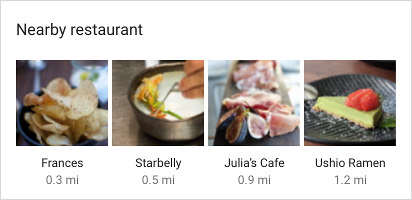
GridRowBuilder example - Nearby restaurants
The example below demonstrates a grid row that contains images and text.
Kotlin
fun createSliceWithGridRow(sliceUri: Uri): Slice {
    // Create the parent builder.
    return list(context, sliceUri, ListBuilder.INFINITY) {
        header {
            title = "Famous restaurants"
            primaryAction = SliceAction.create(
                pendingIntent, icon, ListBuilder.ICON_IMAGE, "Famous restaurants"
            )
        }
        gridRow {
            cell {
                addImage(image1, LARGE_IMAGE)
                addTitleText("Top Restaurant")
                addText("0.3 mil")
                contentIntent = intent1
            }
            cell {
                addImage(image2, LARGE_IMAGE)
                addTitleText("Fast and Casual")
                addText("0.5 mil")
                contentIntent = intent2
            }
            cell {
                addImage(image3, LARGE_IMAGE)
                addTitleText("Casual Diner")
                addText("0.9 mi")
                contentIntent = intent3
            }
            cell {
                addImage(image4, LARGE_IMAGE)
                addTitleText("Ramen Spot")
                addText("1.2 mi")
                contentIntent = intent4
            }
        }
    }
}
Java
public Slice createSliceWithGridRow(Uri sliceUri) {
      if (getContext() == null) {
          return null;
      }
      // Create the parent builder.
      ListBuilder listBuilder = new ListBuilder(getContext(), sliceUri, ListBuilder.INFINITY)
              .setHeader(
                      // Create the header.
                      new HeaderBuilder()
                              .setTitle("Famous restaurants")
                              .setPrimaryAction(SliceAction
                                      .create(pendingIntent, icon, ListBuilder.ICON_IMAGE,
                                              "Famous restaurants"))
              )
              // Add a grid row to the list.
              .addGridRow(new GridRowBuilder()
                      // Add cells to the grid row.
                      .addCell(new CellBuilder()
                              .addImage(image1, ListBuilder.LARGE_IMAGE)
                              .addTitleText("Top Restaurant")
                              .addText("0.3 mil")
                              .setContentIntent(intent1)
                      ).addCell(new CellBuilder()
                              .addImage(image2, ListBuilder.LARGE_IMAGE)
                              .addTitleText("Fast and Casual")
                              .addText("0.5 mil")
                              .setContentIntent(intent2)
                      )
                      .addCell(new CellBuilder()
                              .addImage(image3, ListBuilder.LARGE_IMAGE)
                              .addTitleText("Casual Diner")
                              .addText("0.9 mi")
                              .setContentIntent(intent3))
                      .addCell(new CellBuilder()
                              .addImage(image4, ListBuilder.LARGE_IMAGE)
                              .addTitleText("Ramen Spot")
                              .addText("1.2 mi")
                              .setContentIntent(intent4))
                      // Every slice needs a primary action.
                      .setPrimaryAction(createActivityAction())
              );
      return listBuilder.build();
  }
RangeBuilder
With a
RangeBuilder,
you can create a row that contains either a progress bar or an input range, such
as a slider.
Progress and slider examples are shown in the following images:


RangeBuilder example - Slider
The example below demonstrates how to build a Slice that contains a volume
slider by using an InputRangeBuilder. To construct a progress row, use
addRange().
Kotlin
fun createSliceWithRange(sliceUri: Uri): Slice {
    return list(context, sliceUri, ListBuilder.INFINITY) {
        inputRange {
            title = "Ring Volume"
            inputAction = volumeChangedPendingIntent
            max = 100
            value = 30
        }
    }
}
Java
public Slice createSliceWithRange(Uri sliceUri) {
    if (getContext() == null) {
        return null;
    }
    // Construct the parent.
    ListBuilder listBuilder = new ListBuilder(getContext(), sliceUri, ListBuilder.INFINITY)
            .addRow(new RowBuilder() // Every slice needs a row.
                    .setTitle("Enter app")
                      // Every slice needs a primary action.
                    .setPrimaryAction(createActivityAction())
            )
            .addInputRange(new InputRangeBuilder() // Create the input row.
                    .setTitle("Ring Volume")
                    .setInputAction(volumeChangedPendingIntent)
                    .setMax(100)
                    .setValue(30)
            );
    return listBuilder.build();
}
Delayed content
You should return a Slice as quickly as possible from
SliceProvider.onBindSlice().
Time-consuming calls can lead to display issues, such as flickering and abrupt
resizing.
If you have Slice content that cannot be loaded quickly, you can construct your
Slice with placeholder content while noting in the builder that the
content is loading. Once the content is ready to be displayed, call
getContentResolver().notifyChange(sliceUri, null)
using your Slice URI. This results in another call to
SliceProvider.onBindSlice(), where you can construct the Slice again with fresh
content.
Delayed content example - Ride to work
In the Ride to work row below, the distance to work is determined dynamically and might not be available immediately. The example code demonstrates using a null subtitle as a placeholder while the content loads:

Kotlin
fun createSliceShowingLoading(sliceUri: Uri): Slice {
    // We’re waiting to load the time to work so indicate that on the slice by
    // setting the subtitle with the overloaded method and indicate true.
    return list(context, sliceUri, ListBuilder.INFINITY) {
        row {
            title = "Ride to work"
            setSubtitle(null, true)
            addEndItem(IconCompat.createWithResource(context, R.drawable.ic_work), ICON_IMAGE)
        }
    }
}
Java
public Slice createSliceShowingLoading(Uri sliceUri) {
    if (getContext() == null) {
        return null;
    }
    // Construct the parent.
    ListBuilder listBuilder = new ListBuilder(getContext(), sliceUri, ListBuilder.INFINITY)
            // Construct the row.
            .addRow(new RowBuilder()
                    .setPrimaryAction(createActivityAction())
                    .setTitle("Ride to work")
                    // We’re waiting to load the time to work so indicate that on the slice by
                    // setting the subtitle with the overloaded method and indicate true.
                    .setSubtitle(null, true)
                    .addEndItem(IconCompat.createWithResource(getContext(), R.drawable.ic_work),
                            ListBuilder.ICON_IMAGE)
            );
    return listBuilder.build();
}

private SliceAction createActivityAction() {
    return SliceAction.create(
            PendingIntent.getActivity(
                    getContext(),
                    0,
                    new Intent(getContext(), MainActivity.class),
                    0
            ),
            IconCompat.createWithResource(getContext(), R.drawable.ic_home),
            ListBuilder.ICON_IMAGE,
            "Enter app"
    );
}
Handle disabled scrolling within your Slice
The surface presenting your Slice template may not support scrolling within the template. In this case, some of your content might not be displayed.
As an example, consider a Slice showing a list of WiFi networks:
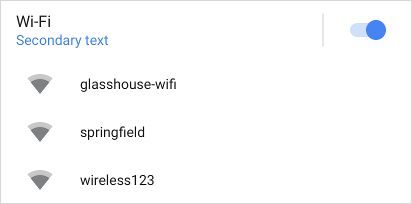
If the WiFi list is long, and if scrolling is disabled, you can add a
See more button to ensure that users have a way to see all items in the
list. You can add this button by using
addSeeMoreAction(),
as shown in the following example:
Kotlin
fun seeMoreActionSlice(sliceUri: Uri) =
    list(context, sliceUri, ListBuilder.INFINITY) {
        // [START_EXCLUDE]
        // [END_EXCLUDE]
        setSeeMoreAction(seeAllNetworksPendingIntent)
        // [START_EXCLUDE]
        // [END_EXCLUDE]
    }
Java
public Slice seeMoreActionSlice(Uri sliceUri) {
    if (getContext() == null) {
        return null;
    }
    ListBuilder listBuilder = new ListBuilder(getContext(), sliceUri, ListBuilder.INFINITY);
    // [START_EXCLUDE]
    listBuilder.addRow(new RowBuilder()
            .setTitle("Hello")
            .setPrimaryAction(createActivityAction())
    );
    // [END_EXCLUDE]
    listBuilder.setSeeMoreAction(seeAllNetworksPendingIntent);
    // [START_EXCLUDE]
    // [END_EXCLUDE]
    return listBuilder.build();
}
This displays as shown in the following image:
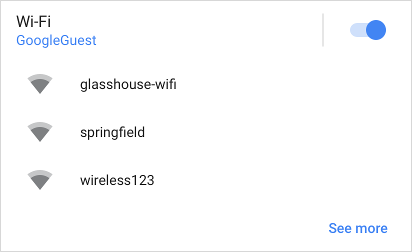
Tapping on See more sends seeAllNetworksPendingIntent.
Alternatively, if you’d like to provide a custom message or row, consider adding a RowBuilder:
Kotlin
fun seeMoreRowSlice(sliceUri: Uri) =
    list(context, sliceUri, ListBuilder.INFINITY) {
        // [START_EXCLUDE]
        // [END_EXCLUDE]
        seeMoreRow {
            title = "See all available networks"
            addEndItem(
                IconCompat.createWithResource(context, R.drawable.ic_right_caret), ICON_IMAGE
            )
            primaryAction = SliceAction.create(
                seeAllNetworksPendingIntent,
                IconCompat.createWithResource(context, R.drawable.ic_wifi),
                ListBuilder.ICON_IMAGE,
                "Wi-Fi Networks"
            )
        }
    }
Java
public Slice seeMoreRowSlice(Uri sliceUri) {
    if (getContext() == null) {
        return null;
    }
    ListBuilder listBuilder = new ListBuilder(getContext(), sliceUri, ListBuilder.INFINITY)
            // [START_EXCLUDE]
            .addRow(new RowBuilder()
                    .setTitle("Hello")
                    .setPrimaryAction(createActivityAction())
            )
            // [END_EXCLUDE]
            .setSeeMoreRow(new RowBuilder()
                    .setTitle("See all available networks")
                    .addEndItem(IconCompat
                                    .createWithResource(getContext(), R.drawable
                                            .ic_right_caret),
                            ListBuilder.ICON_IMAGE)
                    .setPrimaryAction(SliceAction.create(seeAllNetworksPendingIntent,
                            IconCompat.createWithResource(getContext(), R.drawable.ic_wifi),
                            ListBuilder.ICON_IMAGE,
                            "Wi-Fi Networks"))
            );
    // [START_EXCLUDE]
    // [END_EXCLUDE]
    return listBuilder.build();
}
The row or action added via this method is displayed only when one of the following conditions is met:
- The presenter of your Slice has disabled scrolling on the view
- Not all of your rows can be displayed in the space available
Combine templates
You can create a rich, dynamic Slice by combining multiple row types. For example, a Slice can contain a header row, a grid with a single image, and a grid with two cells of text.
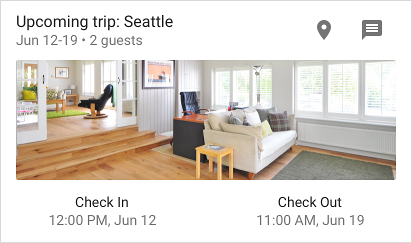
Here's a Slice with a header row along with a grid that contains three cells.
