
1. Introduction

Last Updated: 2022-05-06
Cronet is the Chromium network stack made available to Android apps as a library. Cronet takes advantage of multiple technologies that reduce the latency and increase the throughput of the network requests that your app needs to work.
The Cronet Library handles the requests of apps used by millions of people daily, such as YouTube, Google App, Google Photos, and Maps - Navigation & Transit. Cronet is the most used Android networking library with HTTP3 support.
For more details see the Cronet Features page.
What you'll build
In this codelab, you'll add Cronet support to an image display application. Your app will:
- Load Cronet from Google Play Services, or fall back safely if Cronet isn't available.
- Send requests and receive and process responses using Cronet.
- Display the results in a simple UI.
What you'll learn
- How to include Cronet as a dependency to your app
- How to configure the Cronet engine
- How to use Cronet to send requests
- How to write Cronet callbacks to process the responses
This codelab is focused on using Cronet. Most of the application is pre-implemented and you'll be able to finish the codelab with little prior experience with Android development. That being said, to make the most of this codelab, you should understand the basics of Android development and the Jetpack Compose library.
What you'll need
- Android Studio 2021.1 (Bumblebee) or higher
- An Android 10 or higher device with Google Play Services, or an Android 10+ emulator with Play Store
- Basic knowledge of Kotlin
2. Get the code
We've put everything you need for this project into a Git repo. To get started, clone the repository and open the code in Android Studio.
git clone https://github.com/android/codelab-cronet-basics
3. Establish a baseline
What's our starting point?
Our starting point is a basic image display app designed for this codelab. If you click the Add an image button, you'll see that a new image is added to the list alongside details of how long it took to fetch the image from the internet. The application uses a built-in HTTP library provided by Kotlin that doesn't support any advanced features.
Throughout the course of this codelab, we'll extend the application to use Cronet and some of its features.
4. Add dependencies to your Gradle script
You can integrate Cronet as a standalone library carried with your application, or use Cronet as provided by the platform. The Cronet team recommends using the Google Play Services provider. By using the Google Play Services provider, your application doesn't need to pay the binary size cost of carrying Cronet (about 5 megabytes) and the platform ensures that latest updates and security fixes are delivered.
Regardless of how you decide to import the implementation, you'll also need to add a cronet-api dependency to include Cronet APIs.
Open your build.gradle file and add the following two lines to the dependencies section.
implementation 'com.google.android.gms:play-services-cronet:18.0.1'
implementation 'org.chromium.net:cronet-api:101.4951.41'
5. Install the Google Play Services Cronet provider
As discussed in the previous section, Cronet can be added to your application in multiple ways. Each of these ways is abstracted by a Provider, which ensures the necessary links between the library and your application are in place. Every time you create a new Cronet engine, Cronet looks at all active providers and chooses the best one to instantiate the engine.
The Google Play Services provider isn't usually available out of the box so you need to install it first. Locate the TODO in MainActivity and paste the following snippet:
val ctx = LocalContext.current
CronetProviderInstaller.installProvider(ctx)
This launches a Play Services Task which installs the provider asynchronously.
6. Handle the provider installation outcome
You've successfully installed the provider... Wait, have you? The Task is asynchronous and you haven't handled the outcome in any way. Let's fix that. Replace the installProvider invocation with the following snippet:
CronetProviderInstaller.installProvider(ctx).addOnCompleteListener {
   if (it.isSuccessful) {
       Log.i(LOGGER_TAG, "Successfully installed Play Services provider: $it")
       // TODO(you): Initialize Cronet engine
   } else {
       Log.w(LOGGER_TAG, "Unable to load Cronet from Play Services", it.exception)
   }
}
For the purpose of this codelab, we'll continue using the native image downloader if Cronet loading fails. If networking performance is crucial to your application, you might want to install or update Play Services. For more details, see the CronetProviderInstaller documentation.
Run the application now; if everything works fine, you should see a log statement that the provider was successfully installed.
7. Create a Cronet engine
A Cronet engine is the core object you'll use to send requests with Cronet. The engine is constructed using the Builder pattern, which allows you to configure various Cronet options. For now, we'll continue using the default options. Instantiate a new Cronet engine by replacing the TODO with the following snippet:
val cronetEngine = CronetEngine.Builder(ctx).build()
// TODO(you): Initialize the Cronet image downloader
8. Implement a Cronet callback
Cronet's asynchronous nature means that the response handling is controlled using callbacks, namely, instances of UrlRequest.Callback. In this section, you'll implement a helper callback that reads the entire response to memory.
Create a new abstract class called ReadToMemoryCronetCallback, make it extend UrlRequest.Callback, and let Android Studio autogenerate the method stubs. Your new class should look similar to the following snippet:
abstract class ReadToMemoryCronetCallback : UrlRequest.Callback() {
   override fun onRedirectReceived(
       request: UrlRequest,
       info: UrlResponseInfo,
       newLocationUrl: String?
   ) {
       TODO("Not yet implemented")
   }

   override fun onSucceeded(request: UrlRequest, info: UrlResponseInfo) {
       TODO("Not yet implemented")
   }

   override fun onFailed(request: UrlRequest, info: UrlResponseInfo?, error: CronetException) {
       TODO("Not yet implemented")
   }

   override fun onResponseStarted(request: UrlRequest, info: UrlResponseInfo) {
       TODO("Not yet implemented")
   }

   override fun onReadCompleted(
       request: UrlRequest,
       info: UrlResponseInfo,
       byteBuffer: ByteBuffer
   ) {
       TODO("Not yet implemented")
   }
}
The onRedirectReceived, onSucceeded and onFailed methods are self explanatory so we won't go over the details now, and we'll focus on onResponseStarted and onReadCompleted.
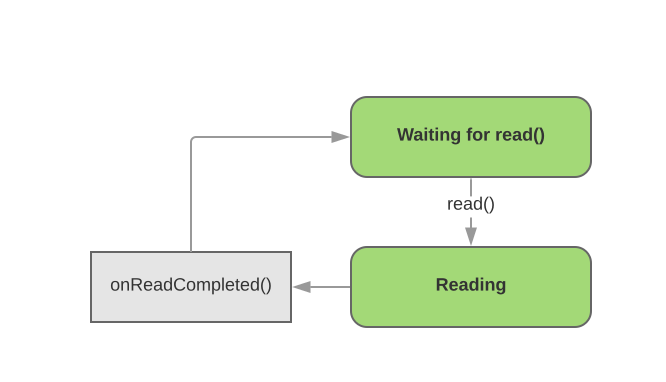
onResponseStarted is called after Cronet sends the request and receives all response headers, but before it starts reading the body. Cronet doesn't automatically read the entire body like some other libraries (for example Volley). Instead, use UrlRequest.read() to read the next chunk of the body into a buffer you provide. When Cronet finishes reading the response body chunk, it calls the onReadCompleted method. The process repeats until there's no more data to read.
Let's start implementing the read cycle. First, instantiate a new byte array output stream and a channel which uses it. We'll use the channel as a sink for the response body.
private val bytesReceived = ByteArrayOutputStream()
private val receiveChannel = Channels.newChannel(bytesReceived)
Next, implement the onReadCompleted method to copy the data from the byte buffer to our sink and invoke the next read.
// The byte buffer we're getting in the callback hasn't been flipped for reading,
// so flip it so we can read the content.
byteBuffer.flip()
receiveChannel.write(byteBuffer)

// Reset the buffer to prepare it for the next read
byteBuffer.clear()

// Continue reading the request
request.read(byteBuffer)
To finish the body reading loop, invoke the initial read from the onResponseStarted callback method. Note that you need to use a direct byte buffer with Cronet. While capacity of the buffer doesn't matter for the purpose of the codelab, 16 KiB is a good default value for most production uses.
request.read(ByteBuffer.allocateDirect(BYTE_BUFFER_CAPACITY_BYTES))
Let's finish the rest of the class now. Redirects aren't of much interest for you so simply follow the redirect just like your web browser would.
override fun onRedirectReceived(
   request: UrlRequest, info: UrlResponseInfo?, newLocationUrl: String?
) {
   request.followRedirect()
}
Last, we need to handle the onSucceeded and onFailed methods. onFailed matches the signature you want to provide for users of your helper callback so you can delete the definition and let extending classes override the method. onSucceeded should pass the body downstream as a byte array. Add a new abstract method with the body in its signature.
abstract fun onSucceeded(
   request: UrlRequest, info: UrlResponseInfo, bodyBytes: ByteArray)
Then, make sure the new onSucceeded method is called correctly when the request completes successfully.
final override fun onSucceeded(request: UrlRequest, info: UrlResponseInfo) {
   val bodyBytes = bytesReceived.toByteArray()
   onSucceeded(request, info, bodyBytes)
}
Huzzah, you have learned how to implement a Cronet callback!
9. Implement an image downloader
Let's use the callback we created in the previous section to implement a Cronet-based image downloader.
Create a new class called CronetImageDownloader implementing the ImageDownloader interface and accepting a CronetEngine as its constructor parameter.
class CronetImageDownloader(val engine: CronetEngine) : ImageDownloader {
   override suspend fun downloadImage(url: String): ImageDownloaderResult {
       TODO("Not yet implemented")
   }
}
To implement the downloadImage method, you need to learn how to create Cronet requests. It's easy - call the newUrlRequestBuilder() method of your CronetEngine. This method takes in the url, an instance of your callback class, and an executor that runs the methods of your callback.
val request = engine.newUrlRequestBuilder(url, callback, executor)
The URL is known to us from the downloadImage parameter. For the executor, we'll create an instance-wide field.
private val executor = Executors.newSingleThreadExecutor()
Last, we use the helper callback implementation from the previous section to implement the callback. We won't go into the details of its implementation as that's more of a Kotlin coroutines topic. You can think of cont.resume as a return from the downloadImage method.
Put all together, your downloadImage implementation should resemble the following snippet.
override suspend fun downloadImage(url: String): ImageDownloaderResult {
   val startNanoTime = System.nanoTime()
   return suspendCoroutine {
       cont ->
       val request = engine.newUrlRequestBuilder(url, object: ReadToMemoryCronetCallback() {
       override fun onSucceeded(
           request: UrlRequest,
           info: UrlResponseInfo,
           bodyBytes: ByteArray) {
           cont.resume(ImageDownloaderResult(
               successful = true,
               blob = bodyBytes,
               latency = Duration.ofNanos(System.nanoTime() - startNanoTime),
               wasCached = info.wasCached(),
               downloaderRef = this@CronetImageDownloader))
       }

       override fun onFailed(
           request: UrlRequest,
           info: UrlResponseInfo,
           error: CronetException
       ) {
           Log.w(LOGGER_TAG, "Cronet download failed!", error)
           cont.resume(ImageDownloaderResult(
               successful = false,
               blob = ByteArray(0),
               latency = Duration.ZERO,
               wasCached = info.wasCached(),
               downloaderRef = this@CronetImageDownloader))
       }
   }, executor)
       request.build().start()
   }
}
10. Final wiring
Let's return to the MainDisplay composable and address the last TODO by using the image downloader we just created.
imageDownloader = CronetImageDownloader(cronetEngine)
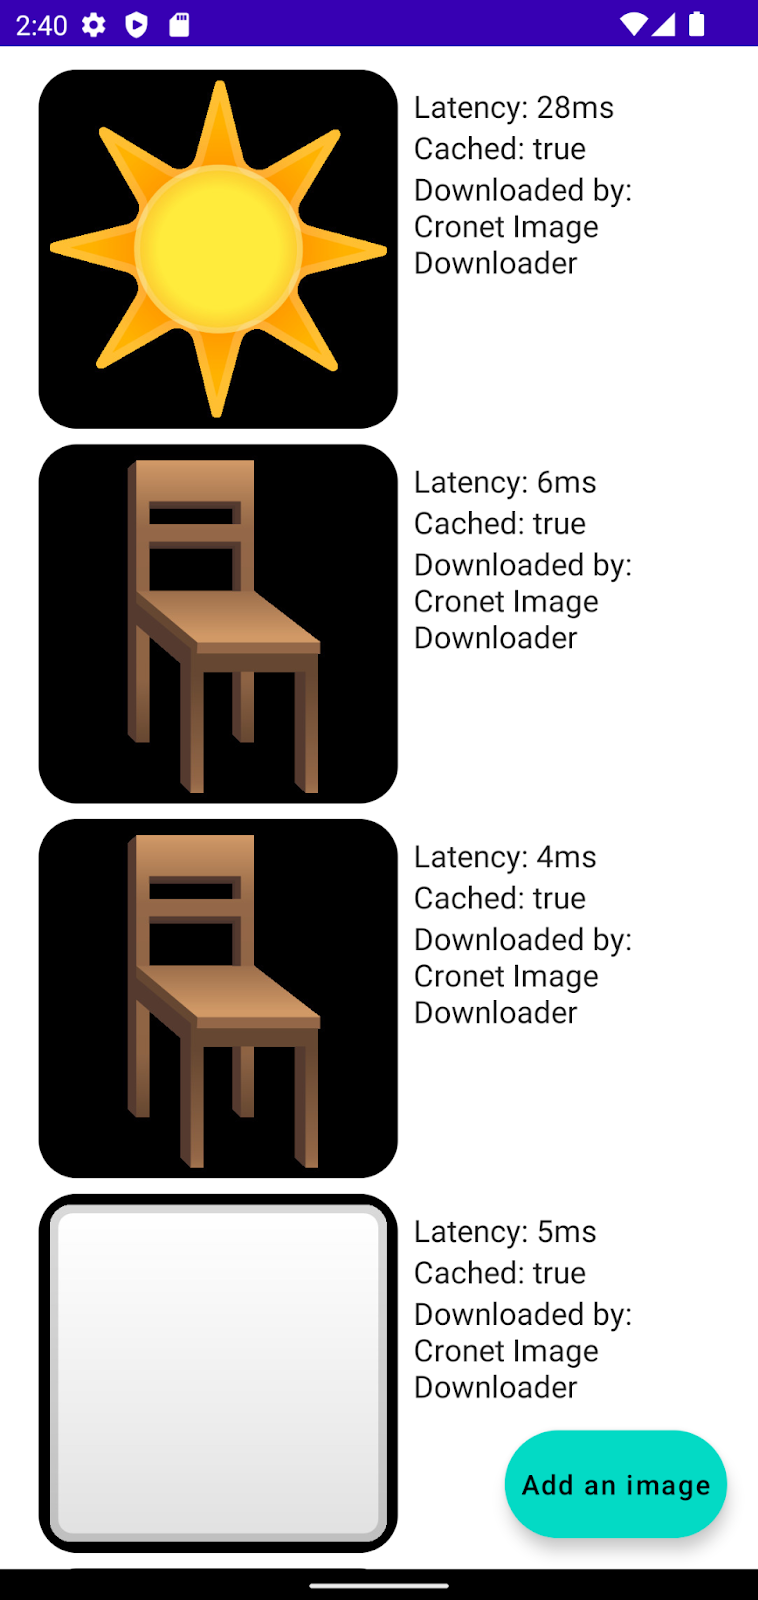
And we're done! Try running the application. You should see your requests being routed through the Cronet image downloader.
11. Customization
You can customize request behavior both on the request level and the engine level. We'll demonstrate this with caching, but there's many more options. For details, see UrlRequest.Builder and CronetEngine.Builder documentation.
To enable caching on the engine level, use the builder's enableHttpCache method. In the example below, we use an in-memory cache. For other available options, see the documentation. Creating the Cronet engine then becomes:
val cronetEngine = CronetEngine.Builder(ctx)
   .enableHttpCache(CronetEngine.Builder.HTTP_CACHE_IN_MEMORY, 10 * 1024 * 1024)
   .build()
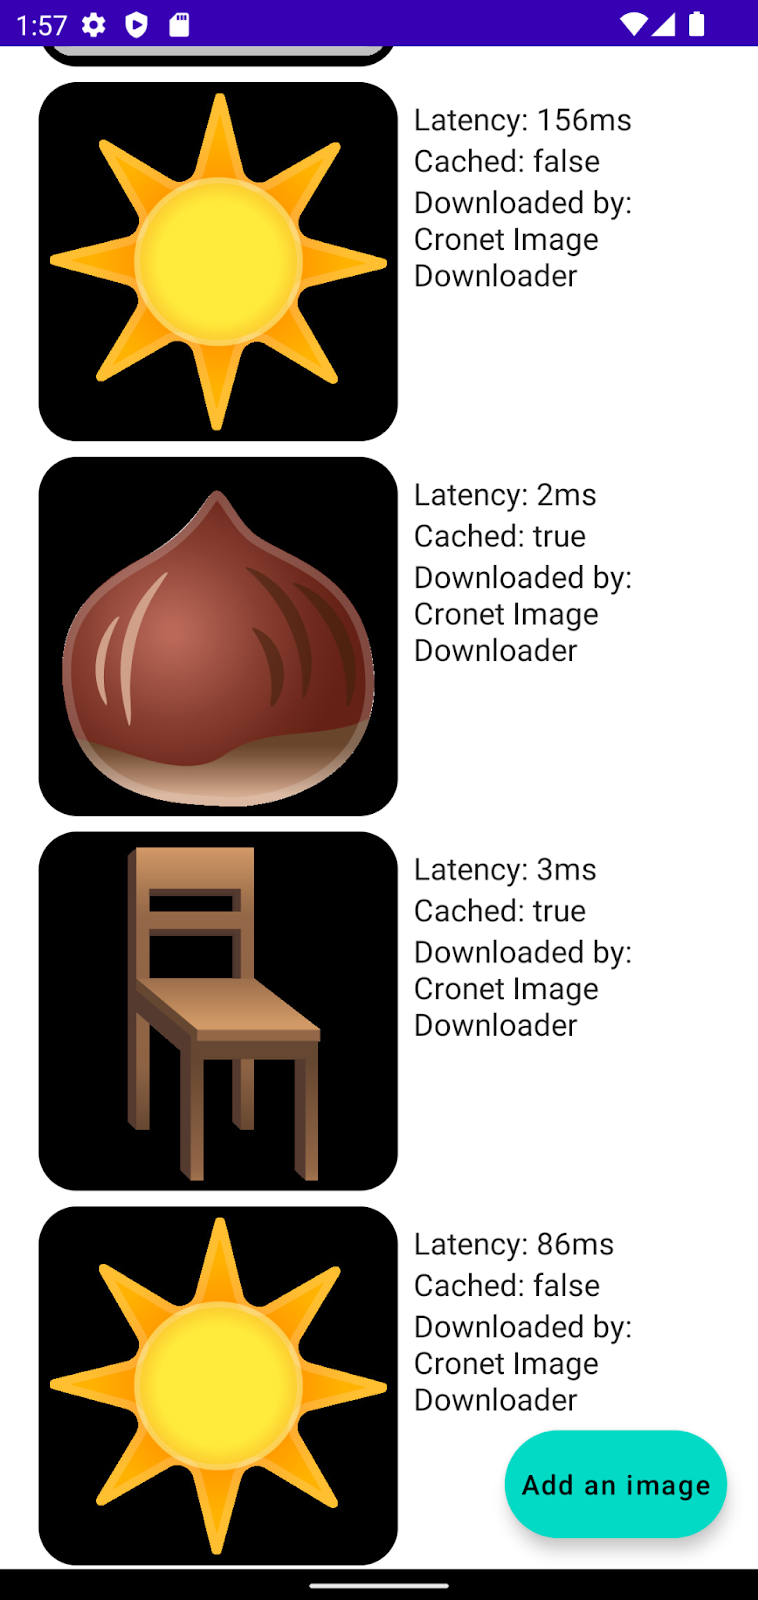
Run the application and add a few images. Those that were added repeatedly should have a significantly shorter latency and the UI should indicate they were cached.
This functionality can be overridden on a per request basis. Let's put a little hack in our Cronet downloader and disable caching for the Sun image, which is the first of the URL list.
if (url == CronetCodelabConstants.URLS[0]) {
   request.disableCache()
}

request.build().start()
Now run the application again. You should notice that sun images aren't being cached.
12. Conclusion
Congratulations, you've reached the end of the codelab! In the process, you learned the basics of how to use Cronet.
To learn more about Cronet, check out the developer guide and source code. Also, subscribe to the Android Developer blog to be the first to know about Cronet & general Android news.